Survey plan and Data acquisition#
The initial phase of UAV-based photogrammetry is data acquisition, which involves capturing aerial photographs with a specific objective and subject. To gather high-quality data, it is crucial to adhere to best practices when taking photos for photogrammetry.
When acquiring data in the field, it is important to consider the requirements for acquisition. Like any project, there’s a connection between time, quality, and costs. Time refers to the available period for data collection, cost represents the necessary resources, and quality represents the resolution and fit-to-purpose that we want for our DEM or 3D model.
Let’s exemplify it. If you want a very high-resolution model of an outcrop, you will have to spend significant time acquiring good-quality data, and you will need many resources such as a high-quality camera and UAV, batteries for your UAV and controller, images in your memory card, etc. Suppose you have very little time to properly acquire data. In that case, the quality of the model will be very poor unless you use extremely expensive resources such as multiple multirotors flying simultaneously or predefined flights with a vertical take-off and landing (VTOL) UAV containing a very high-resolution camera. If you are limited by the resources, let’s say, by only having one battery for your UAV, the time you will be able to spend acquiring data will be low, and you will either not cover the entire area that you want or collect general images ending up having a low-resolution model.
Therefore, when collecting data in the field for photogrammetric studies, it’s vital to assess the resolution and measurement accuracy needed, the resources you have, and the time you can invest in flying to achieve the best possible outcome.
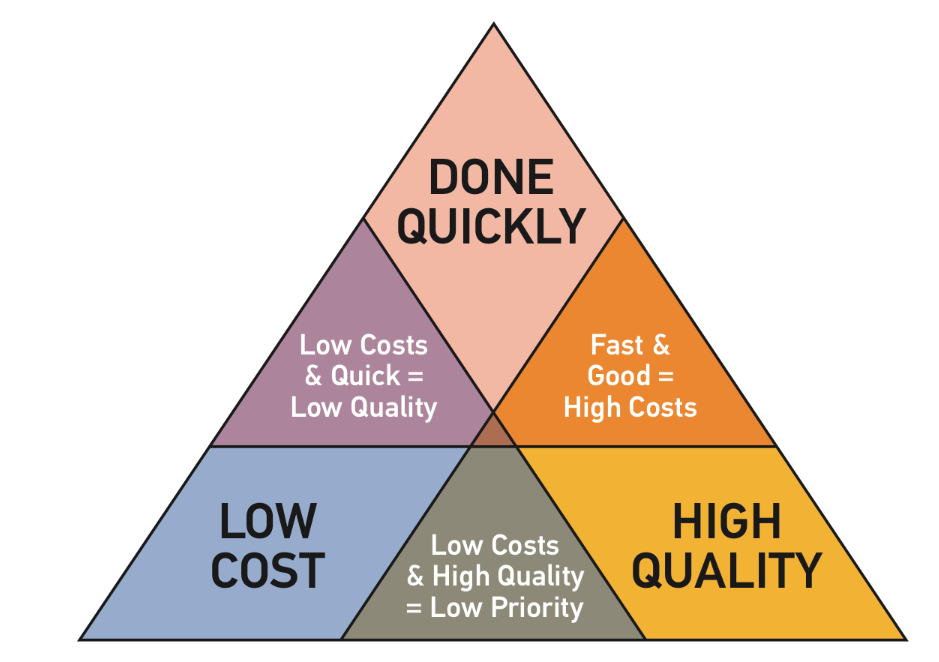
Fig. 44 The principle of the triangle suggests that of the three points, you can only have two at a time, not three. Image source.#
The data acquisition stage also contains processes during which we collect additional data, for example, Ground Control Points (GCPs).
Learn how to fly
In order to collect virtual outcrop data, it’s important to have experience in operating a UAV, or in other words, that you know how to fly. Don’t rely on the availability of automated mapping software to do this for you.
Types of UAV for photogrammetry#
Data source
Most of the pieces of information in this section have been published by Konert and Dunin [2020].
The market offers a wide selection of UAVs, each with different features and price ranges suitable for professionals and scientific purposes. When it comes to virtual outcrop modelling, multirotors like the DJI Mavic series or DJI Phantom series are ideal for beginners. While fixed wing drones are useful for horizontal outcrops and can cover large areas quickly, they come with a few limitations such as having only a downward-facing camera, being expensive, and requiring mission planning that may not always be suitable for fieldwork.
DJI Mavic Series
This module focusses on DJI Mavic Series. However, it is applicable to other brands and multirotor UAVs with small technical differences.
To effectively use a UAV for photogrammetric modelling of geological outcrops, there are certain requirements that need to be met. These include:
The UAV should have the ability to be piloted manually while providing a live camera feed.
The UAV should be stable in windy conditions and have satellite-assisted positioning. Cheaper units that lack these features are only suitable for indoor flying.
The UAV should have a range of at least 500 m, which is the maximum distance for line of sight flying in most countries. The unit should be capable of achieving this comfortably.
The camera should be of good quality and have various controls like speed, aperture, etc. The DJI Phantom 4 Pro and Mavic Pro 2 have a 20-megapixel 1-inch sensor that produces excellent results. Good results can also be achieved with slightly smaller sensors like the 12-megapixel sensor on smaller Mavics and older Phantoms.
The camera must have a timelapse function (intervalometer) that allows for taking photos at preset intervals (normally 3 to 5 seconds).
The camera should be linked to the navigation system so that the UAV’s position is recorded when each photo is taken.
Limitations of UAV systems#
Battery life#
One major issue with UAVs is their short battery life. Consumer-grade drones with multiple rotors can only fly for around 20-40 minutes. However, using fixed-wing airframes can increase flight time. Note that battery life can be affected by factors such as ambient temperature, the weight of the drone, wind speed, and take-off altitude.
Miniaturisation and optimisation#
UAVs have to meet specific weight and size requirements. This means that components such as cameras, GPS, and IMU modules must be miniaturized, potentially leading to less precise or suboptimal data.
Accuracy#
Most UAVs currently available to consumers have GNSS navigation modules that can determine their position with an accuracy of about a meter. Drones with centimeter-accuracy receivers are much more expensive, costing roughly 5-6 times as much.
An alternative is the use of GCPs measured in the field, which can supplement or replace exterior orientation measurements. However, this method requires time-consuming field measurements that must be done with great care to ensure the highest possible accuracy in determining the position of the points.
Choice of outcrop#
To be a valuable resource for studying, an ideal outcrop should be geologically interesting. Virtual outcrops can be quite vast and include overhangs and narrow canyons. When flying a UAV in these environments, it is essential to be extremely careful not to crash your UAV against the cliffs. Larger outcrops are typically flown in segments and pieced together, either when the models are built or can be collected as separate models and combined later Howell et al. [2021].
For those who are new to acquisition campaigns, it is recommended to start with a small and compact outcrop for the first flights and gradually work up to more challenging locations. A reasonable size to begin with is around 200-300 meters long and up to 30 meters high. This way, you can always fly within line of sight and never exceed 120 meters in height.
Safety first!
Safety is crucial when using a UAV, so it is essential to ensure that the outcrop can be flown safely.
Survey design#
If you are using your drone for a specific purpose, such as collecting a virtual outcrop model, having a flight plan for your UAV is important to achieve your goal. This will help you control various factors, ensure that it is legally and safely feasible (revise SESSION 1 - UAV flight regulations and SESSION 2 - UAV pre-flight check list), safeguard your equipment, and achieve your mission objective.
The next step is to design the survey, which can be done either in the field or in the lab. It’s best to consult with your visual observer beforehand to agree on the flight plan. The size of the area covered and the expected resolution of the virtual outcrop will depend on the data being collected.
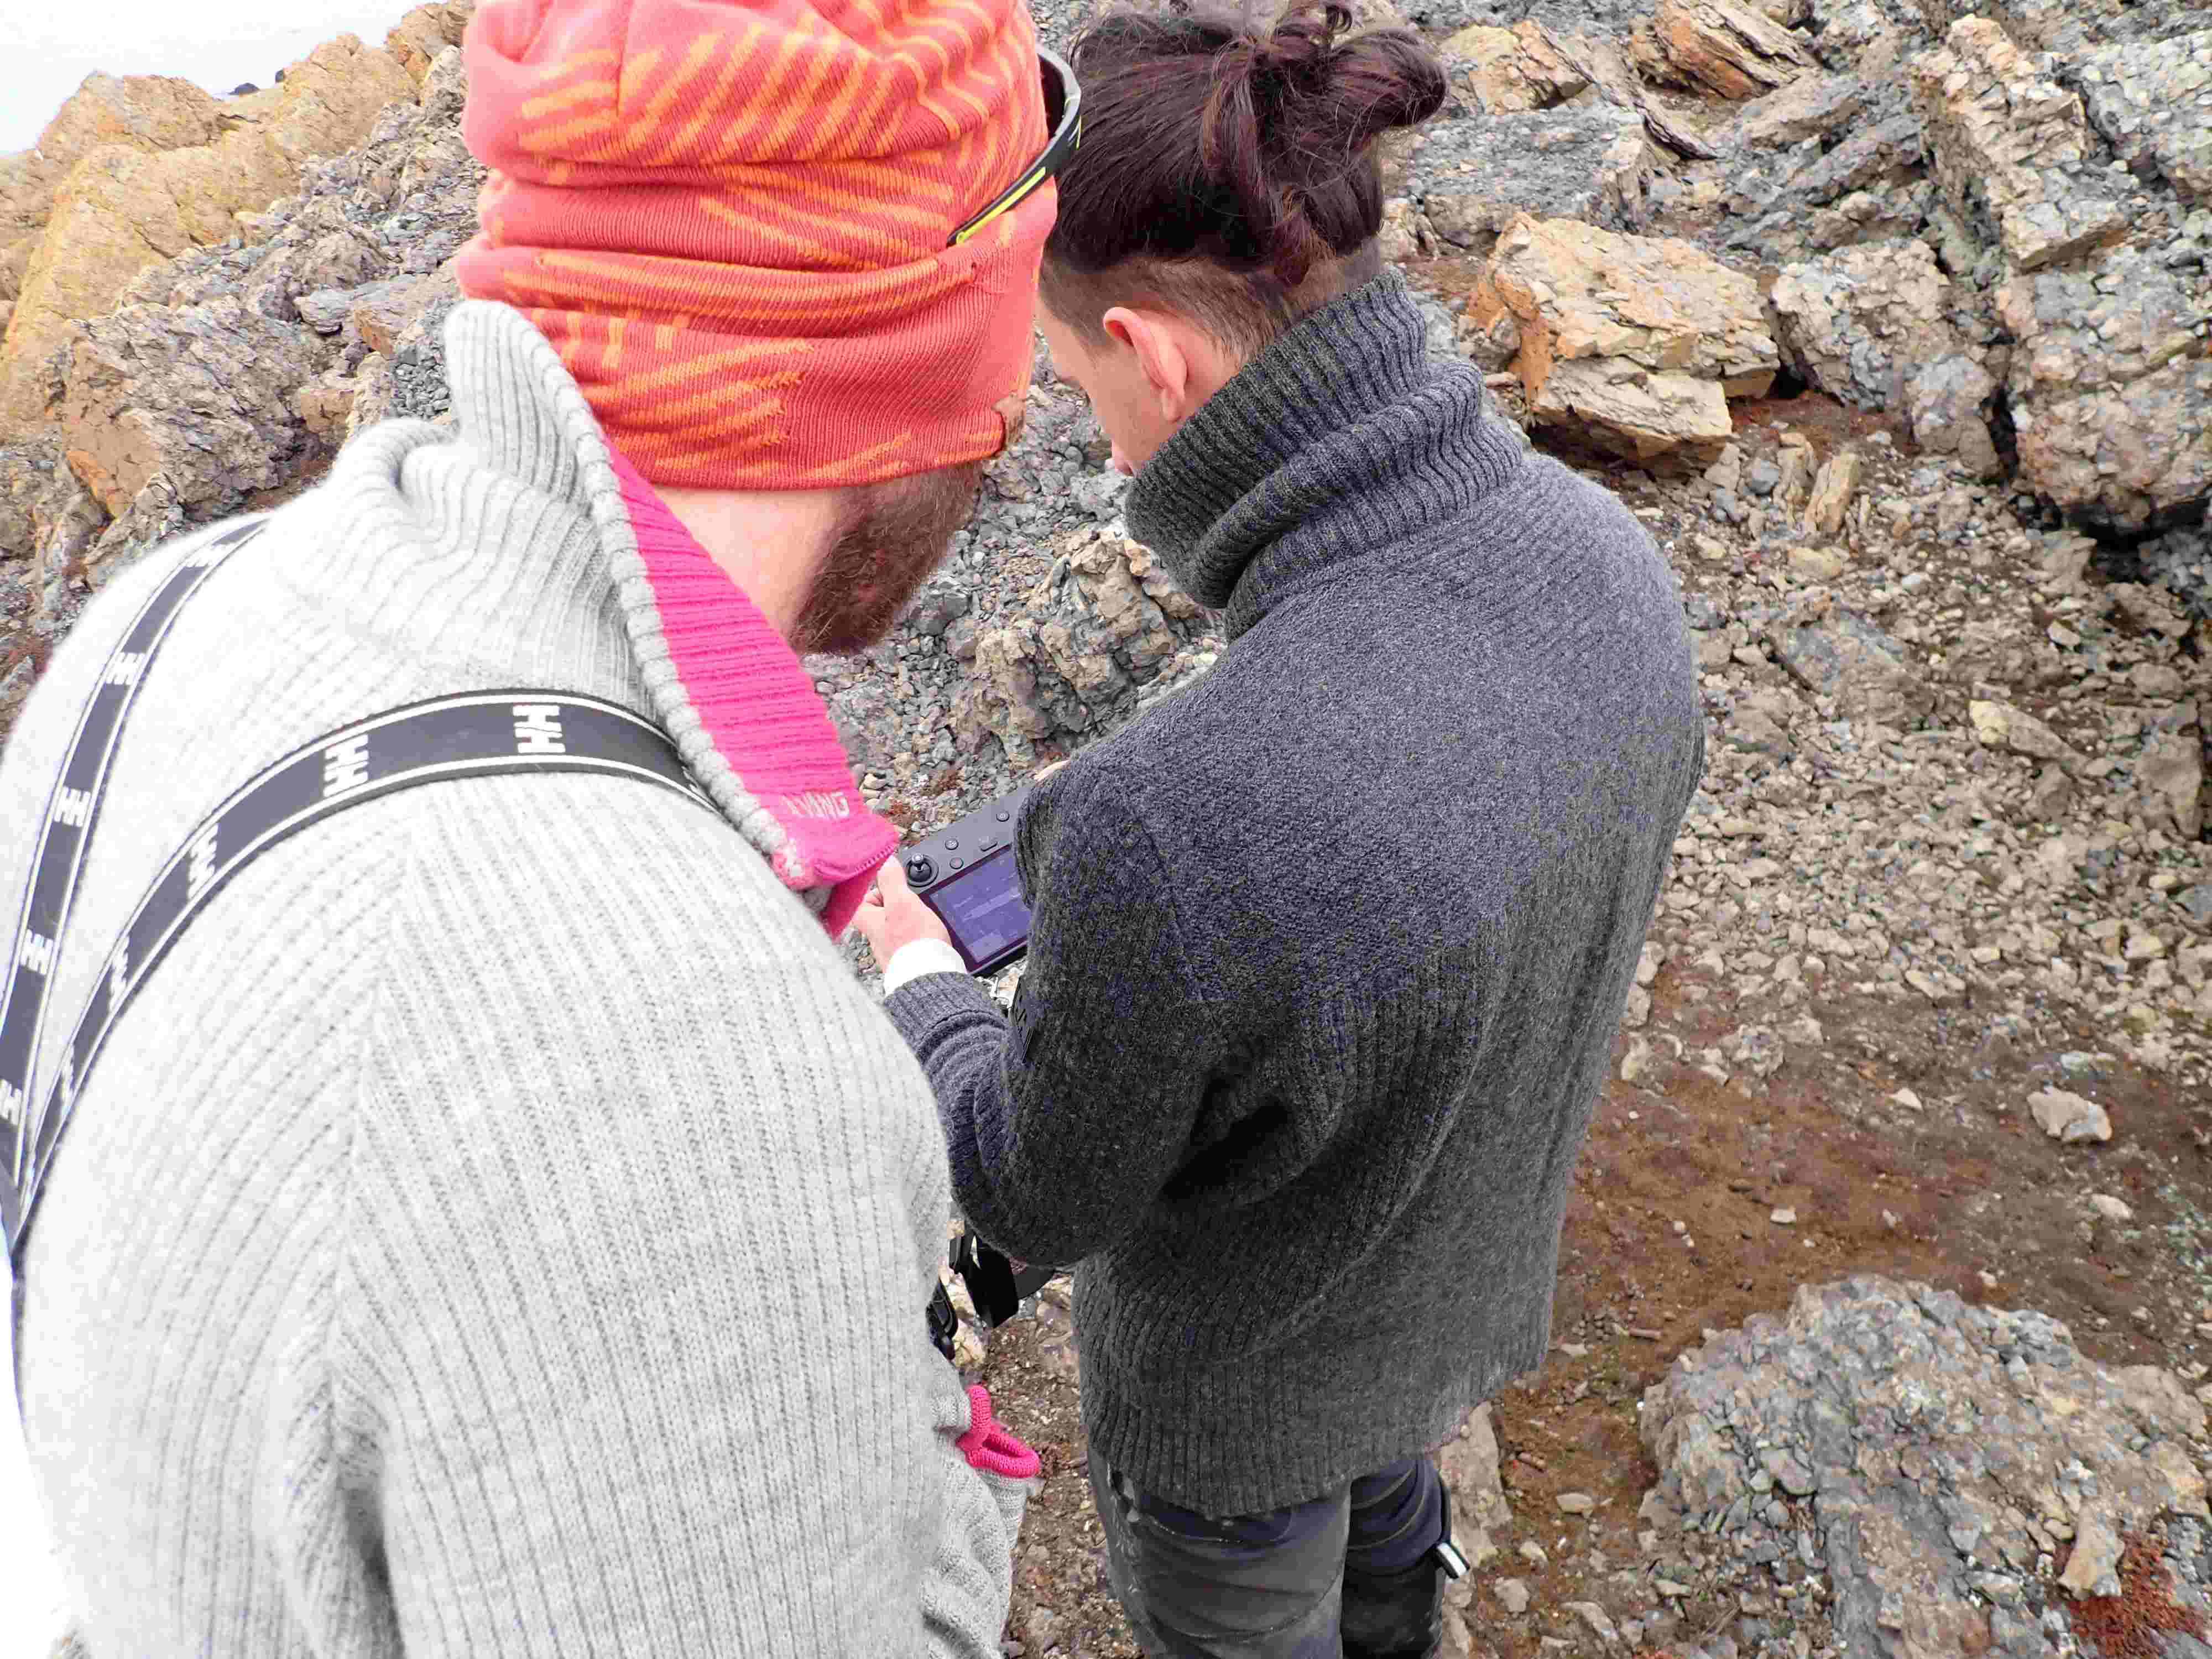
Fig. 45 Pilot and visual observer discussing and adjusting the flight plan in the field.#
Capturing usable images: the Exposure triangle#
The aperture, shutter speed and ISO are recurring parameters of importance and key to data acquisition in the field and in the lab. In particular, they work together to create an exposure and affect your captured image in different ways. This can be visualised through use of the exposure triangle [The Exposure Triangle, 2017].
Aperture#
Aperture affect how much light passes through the lens, and, with it, the depth of field of the image [Understanding Aperture and Depth of Field, 2017]. Aperture is typically measured in f-stops, with smaller numbers meaning more light and larger numbers less light that hits the sensor. When you open your aperture (i.e., lower number, see (Fig. 46)):
more light hits the sensor
depth of field decreases.
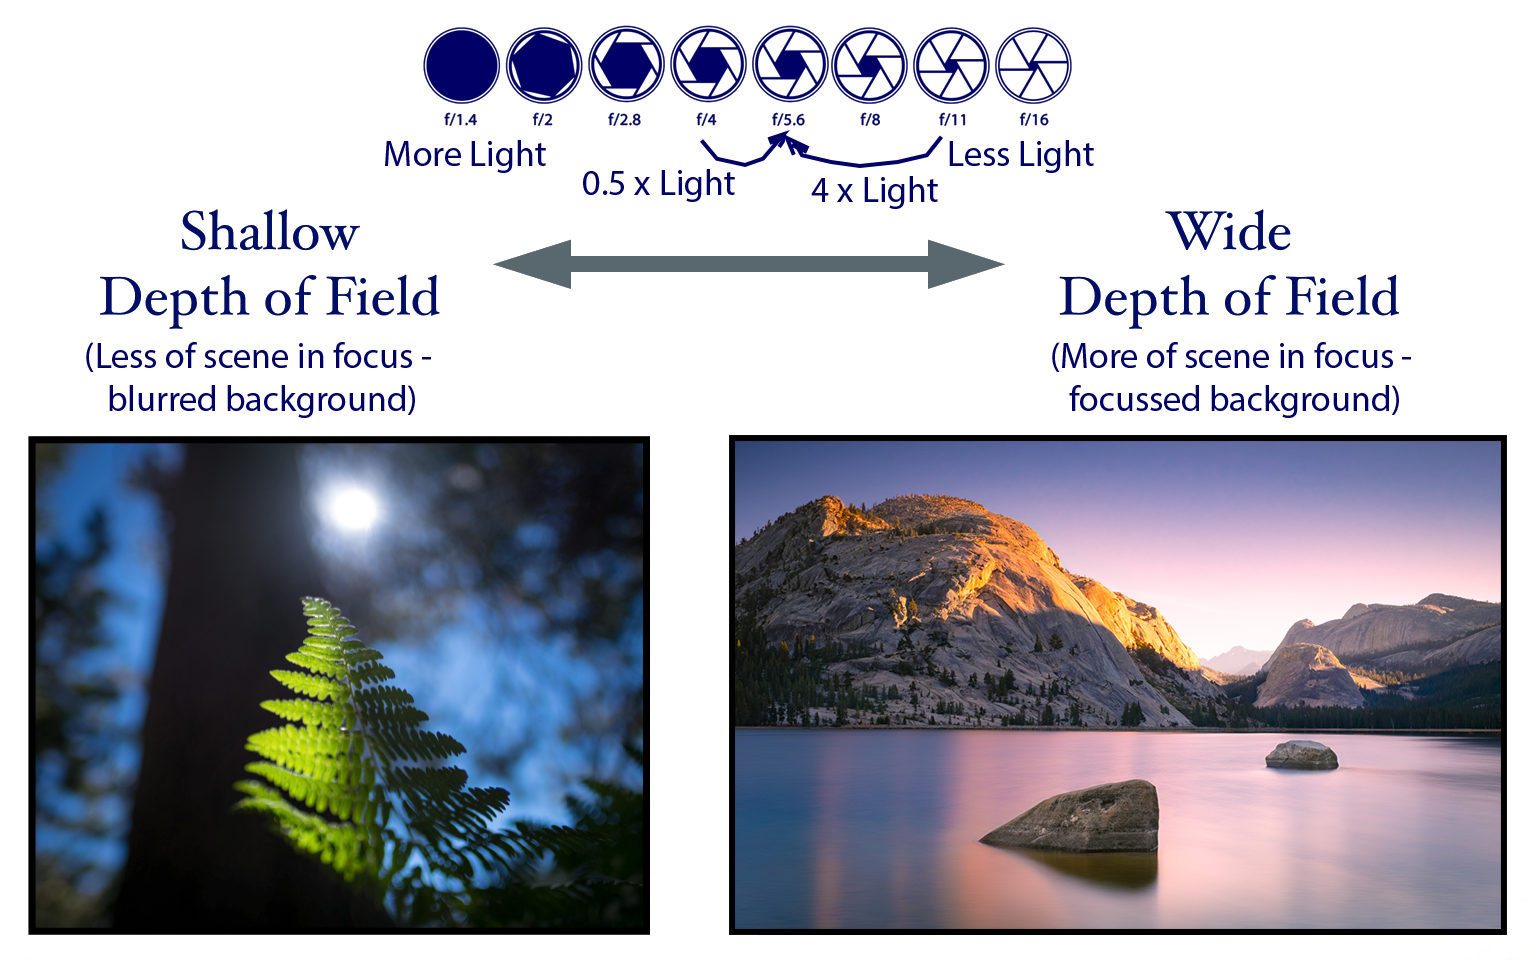
Fig. 46 The impact of changing the aperture on depth of field and focus. Image modified from [Understanding Aperture and Depth of Field, 2017].#
Shutter speed#
Your camera’s shutter governs the duration that light passes through and is captured by your camera’s sensor. The amount of time is typically listed in seconds, and each step on the shutter speed scale will give you half or twice the amount of light. All light captured by the sensor over the amount of time (“acquisition time”) is averaged to give rise to a captured image. Shutter speeds that result in longer acquisition times, thus allow for more light to hit the sensor, and thus result in brighter images. Secondly, capturing movements within the acquisition time will result in motion blur. Some additional examples of how to deal with shutter speed are found in e.g. [Shutter Speed, 2017].
ISO#
The ISO number describes how much the processor in your camera amplifies the light collected by the sensor. It is in a sense an indicator for how much the image is altered to produce a correctly exposed image. As with shutter speed and aperture, each step on the ISO scale doubles or halves the camera’s sensitivity. However, as it increases the camera’s sensitivity, it also introduces noise! It is thus always advised to keep the ISO as low as possible.
Working the triangle: The Rule of Equivalent Exposures#
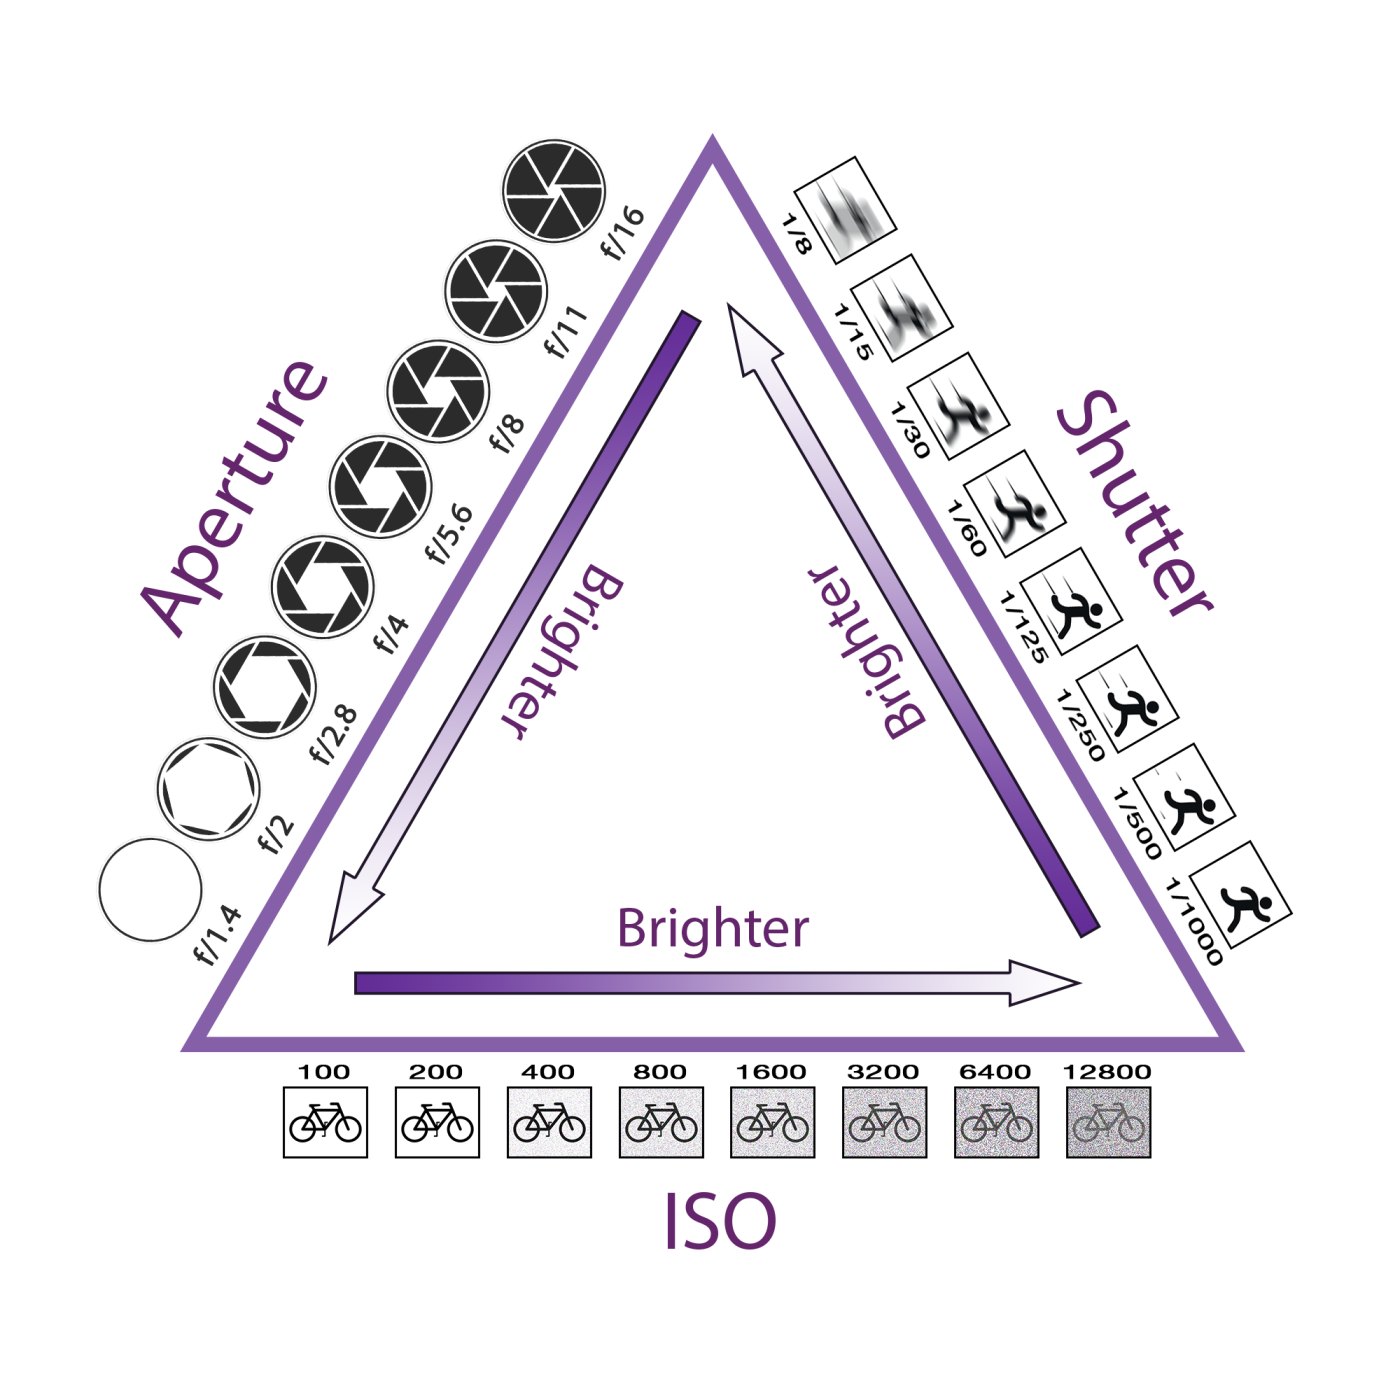
Fig. 47 The exposure triangle. Image from [The Exposure Triangle, 2017].#
Exposure and capturing images with the right settings thus comes down to an interplay between the ISO, shutter speed and aperture values [The Exposure Triangle, 2017]. Each click or stop-change in either of them halves or doubles the amount of light that reaches the sensor. Thus, if one action cuts the light by half, then you must double it in another to retain the same level of brightness in your captured images.
Digital outcrop resolution#
The resolution of the virtual outcrop is dependent on the camera’s sensor resolution and the proximity of the photographs to the cliff. The maximum resolution of the data that can be acquired, is typically referred to as the ground-sampling-distance (GSD), and can be calculated as follows:
in which \(Alt\) equals the altitude in metres, \(S_{h/w}\) either sensor width or height in millimetre, \(f\) the focal length in millimetre, and \(im_{h/w}\) the value corresponding to the height of the image in pixels.
For instance, DJI Mavic Series or DJI Phantom Series cameras have a 94 degree lens equivalent to 20mm on a standard SLR. Therefore, the height of the image in landscape format is roughly equal to the distance of the camera from the cliffs.
This means that as a rule of thumb, if you want to obtain a resolution of less than 1 cm per pixel, photographs should be taken at a distance of approximately 30 meters from the outcrop.
GSD Calculator
To estimate outcrop resolution, you can use the online app GSD Calculator. However, this estimate is only a guide since the surface may not be completely flat, making it difficult to maintain a consistent distance and causing the GSD to vary based on the terrain complexity.
Light and shadows#
When planning your UAV acquisition survey, it is crucial to consider outcrop orientation and lighting. Bad light on your pictures will require strong post-processing and likely result in a bad model.
Smooth outcrops in direct sunlight will produce excellent results, but rough outcrops and harsh lighting can create shadows in the model.
To get the best surveying results, it’s recommended to do so on a bright, overcast day with even lighting. This helps to minimize shadows and provide ample light for your outcrop. Contrary to popular belief, a sunny day with clear blue skies is not ideal for surveying. The strong sunlight can create excessive shadows, which may cause issues with camera exposure and focus. This can lead to issues like flare and details being obscured by shadow, especially when the sun is directly behind or above the cliffs.
Although it may be necessary to collect data in these conditions, it is crucial to avoid them whenever possible by planning ahead. If time and weather permit, it would be beneficial to collect data at different times of day to optimize lighting.
Camera set-up and calibration#
Proper camera setup is crucial in creating a high-quality 3D model. Before every flight, make sure to adjust the camera settings according to the light conditions to ensure optimal data collection.
Image format#
With the DJI UAVs you have the possibility to switch the image file format to either RAW or JPG.
If you’re wondering which image file format to use, we suggest choosing JPG. In most cases, it’s best to go with JPG since RAW files are much larger and require processing before they can be used, which can be a problem when dealing with hundreds or even thousands of images. Unless you’re dealing with challenging or fluctuating lighting conditions, shooting in RAW isn’t necessary. However, if you do encounter such situations, RAW images will give you more flexibility to adjust exposure stops later on.
Tip
For your first models, we suggest sticking with JPG format.
Shutter speed and camera aperture#
When taking photographs, it is important to balance the aperture and shutter speed. The aperture controls the depth of field, while the shutter speed helps prevent blurry images.
For uniform lighting and non-backlit subjects, auto exposure will suffice. However, for better modelling, a small aperture with a high F-number and depth of field is recommended. If the subject is well-lit, choose Aperture Priority and select F/11 or higher. This will reduce the shutter speed, but a fast shutter speed of 1/250 or faster is necessary to compensate for the movement of the UAV.
To determine the appropriate shutter speed for your selected aperture, use spot metering by pointing the camera at the darkest part of the subject. Adjust the ISO to compensate, but keep it as low as possible to minimize sensor noise. Using DJI Phantom Series and DJI Mavic Series cameras, an ISO of up to 800 or even 1600 is still acceptable.
White balance#
For consistent photo quality, it’s important to manually set the White Balance (WB) to either sunny or cloudy depending on the lighting conditions, instead of leaving it on auto. This will prevent color variations in your survey photos.
Timelapse#
The frequency of the camera timelapse depends on the data being collected and the speed at which the UAV is flying.
Three seconds works well for detailed outcrops flown in Tripod Mode (max speed of 1 m/s)
Five seconds works well when acquiring general images of the outcrop (recommended speed 3-4 m/s)
Seven seconds is enough to acquire overview images of large outcrops such as mountainsides (the UAV speed can be up to 10 m/s)
Do not overtake images
At the beginning of this session, it was emphasized that finding a balance between time, resources and resolution is crucial. Gathering sufficient data to avoid gaps in the model and obtaining a satisfactory resolution without overwhelming images is key. If there is an excessive amount of data, the model may be difficult to process on your computer.
Focus#
We recommend using the camera’s auto-focus feature when taking pictures to make data collection easier. However, using the timelapse option with auto-focus does not guarantee that the camera will stay focused for every photo. You will need to adjust it manually for each shot by half-clicking the Focus / Shutter button on the upper-right of the DJI smart controller’s top.
Motion blur and shutter speed#
Closely related to many of the parameters described above is the motion blur phenomenon. This effect occurs when a picture is taken with an exposure time that is longer than it takes for the camera to move past the object. In other words, motion blur occurs when the speed of movement is high in comparison with the shutter speed and the GSD. In drone mapping this typically occurs when flying at high speed and while taking images in suboptimal light conditions (i.e., darkness) or at low altitudes (i.e., close-up).
Motion blur is one of the main reasons behind low-quality mapping products and suboptimal textures. It is also one of the easiest to mitigate: A good rule of thumb is to always check that the camera shutter speed is faster than the time it takes for a point on the ground to move one unit of GSD. The GSD (in metres) can be calculated according to Equation (1), and then used in the calculation below:
Herein \(SS_{max}\) corresponds to the maximum shutter speed in seconds, and \(V\) corresponds to the speed of the drone in m/s.
The following table provide input on the maximum shutter speed in seconds at a given velocity and altitude above the surface for a DJI Mavic 2 Pro drone:
1 m/s
2 m/s
3 m/s
4 m/s
5 m/s
10 m/s
15 m/s
15 m
1/262
1/524
1/786
1/1048
1/1311
1/2622
1/3932
30 m
1/131
1/262
1/393
1/524
1/655
1/1311
1/1966
45 m
1/87
1/174
1/262
1/349
1/436
1/873
1/1311
60 m
1/65
1/131
1/196
1/262
1/327
1/655
1/983
90 m
1/43
1/87
1/131
1/174
1/218
1/436
1/655
120 m
1/32
1/65
1/98
1/131
1/163
1/327
1/491
150 m
1/26
1/52
1/78
1/104
1/131
1/262
1/393
1 m/s
2 m/s
3 m/s
4 m/s
5 m/s
10 m/s
15 m/s
15 m
1/243
1/486
1/730
1/973
1/1217
1/2434
1/3651
30 m
1/121
1/243
1/365
1/486
1/608
1/1217
1/1825
45 m
1/81
1/162
1/243
1/324
1/405
1/811
1/1217
60 m
1/60
1/121
1/182
1/243
1/304
1/608
1/912
90 m
1/40
1/81
1/121
1/162
1/202
1/405
1/608
120 m
1/30
1/60
1/91
1/121
1/152
1/304
1/456
150 m
1/24
1/48
1/73
1/97
1/121
1/243
1/365
UAV controller layout#
When you operate DJI UAVs with the smart controller and pre-set options, you can use the buttons and dials on the top to control the camera. On the left side, you’ll find the video Record/stop button, and below it is the Gimbal control dial, which you can rotate to adjust the camera’s vertical angle. On the right side, there’s the Focus / Shutter button, which we previously advised you to half-click to focus before each photo.

Fig. 48 DJI smart controller top layout. Image source.#
Flight pattern#
Vertical outcrops#
To get the best data from a flight, making at least two (ideally three) passes along each section of the outcrop is recommended. The UAV should be flown sideways, facing directly at the cliff. As you fly, ensure that there’s at least a 70% overlap between adjacent photos. If the outcrop is curved or concave, adjust your flight path accordingly to capture all angles. You can take as many photos as needed, and sort them later during processing. The first pass should be low, with the camera pointing horizontally and tilted at a 10-degree angle. The second pass should be done from a higher altitude and with the camera tilted at a 30-40 degree angle. Finally, the third pass should be done from an even higher altitude, with the camera tilted at an 80-degree angle. Collecting overview photos taken from further back can be useful as a reference in the model-building process Howell et al. [2021].
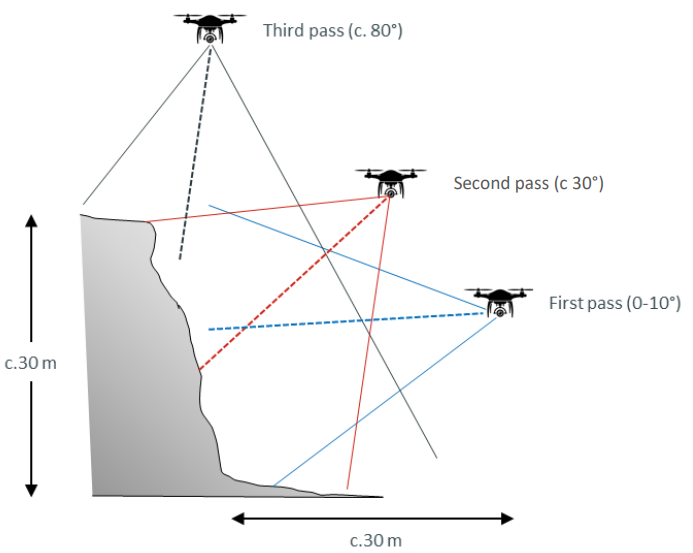
Fig. 49 Figure published by Howell et al. [2021]. Fly at least two transects to ensure complete coverage of the cliff section.#
For larger outcrops or lower-resolution models, two flight passes might be enough. In this case, the UAV should be flown further away from the outcrop to fit the entire height in each photo. The first pass should be done with the camera facing downward at a 5-15 degree angle, and the second pass should be done with the camera tilted up at a 20-40 degree angle and the UAV flying higher.
When flying with an A1/A3 pilot license, you can only fly within your line of sight. This should be sufficient for capturing a few hundred meters of lateral outcrop coverage. To capture longer cliff lines, simply move along the cliff and capture further sections from different take-off sites. It’s important to maintain overlap between flights for model registration purposes, and to stay organized and keep track of what you’ve done. The DJI controller has a map that retains previous flight paths, making it easy to track progress and ensure full coverage.
For high outcrops, the same procedure of multiple flight passes per section should be followed. The tilt angle of the camera can be adjusted to comply with flying regulations and ensure that the drone never flies more than 120 meters above ground. It’s often helpful to fly at the same height twice, once with the camera looking semi-horizontal and once tilted a few degrees to provide context around the outcrop area.
Start with easy outcrops
If you’re new to this, we suggest starting with smaller outcrops and working your way up to more complex sites.
Horizontal outcrops#
To map planar surfaces like wave-cut platforms, you don’t need to make three passes. Instead, you can fly a grid with the camera facing downwards. This can be easily done with a mission planning app. Alternatively, you can use the map function and fly around the perimeter of the area you want to record. Then, move in from one of the sides until you achieve a view with a 70% overlap. Fly a straight line, move sideways by the same amount, and repeat until the box is filled. If there are any vertical ledges or shelves in the view, flying some passes looking at 40 degrees will improve the model.
Contingency plans#
It is wise to have contingency plans in place in the event your UAV loses connection or low battery levels.
While DJI UAVs typically provide alerts for battery connectivity issues, malfunctions, and remote controller disconnection, the response time may sometimes be brief. In the event of any flight problems, the top priority should always be to quickly and safely land the UAV in a secure location.
Now you are ready to fly. Enjoy your flight, and always fly safely and considerately!