
Foldio360 Tutorial#
This tutorial features the following learning goals:
You will use Foldio360 light box and/or Foldio360 Smart Dome to acquire high-quality pictures to digitize small objects.
Hardware and Software requirements
In this tutorial, we suggest using the following hardware and software to follow along:
A light box (Foldio 3)
(Smart) turntable (Foldio360 (Smart Dome))
A DSLR camera or equivalent
Foldio360 App for phone/tablet
Remote imaging app for the camera (here illustrated by Imaging Edge App for PC)
Hardware and Software requirements
Note that the tutorial that follows illustrates the capturing process with an Orangemonkie Foldio360 Smart Dome and Sony alpha camera. The methodology has been optimised from Betlem et al., [BBO+20], and may be adapted for similar setups featuring turntables, lightboxes and cameras.
Photo acquisition with Lightbox Foldio360#
Foldio360 App Settings and Components#
Log in to the Foldio360 App on your phone and connect to your Foldio360 device by clicking on “Select device”. If Bluetooth is connected, the app will automatically detect the Foldio device and connect to it.
Problems connecting to the lightbox
Make sure that the Foldio360 light box/Foldio360 Smart Dome is turned on
Turn on the bluetooth on your phone/tablet
Disconnect other devices connected to the Foldio360 device
Now that your phone/tablet is linked with the Foldio360 light box, you can edit and adjust multiple parameters from the Foldio360 light box/Foldio360 Smart Dome for optimal photo acquisition.
Going from left to right on the Foldio360 App menu, you will find:
Rotating speed: This parameter defines the rotating speed of the platform. We suggest using 1x for better acquisition to prevent wobbly sample movements from inducing (micro)blurring.
Frame: This parameter defines the number of times that the platform will stop to take a picture. There are three different options: 24, 36 or 48. The more stops you select, the more shots you will take from your sample.
Center indicator: When selecting it, a light grid will appear inside the box for optimal positioning of your sample. Make sure to deactivate it when starting the photo acquisition.
Turn table: Here one may manually turn the turn table.
Brightness: Allows for the adjustment of the lighting within the light box. Optimal lighting prevents and clear shadows from emerging either around or beneath the target.
Color temperature: The color temperature controller allows for the adjustment of the produced light temperature. It is recommended to match this with the acquisition setting on the camera.
Menu: Menu enabling the selection of the turntable device (over Bluetooth) imaging device (typically Phone 360 or DSLR 360). Note that the turntable transmits imaging queues through use of infrared (IR), which the selected imaging device needs to support (and have enabled in settings).
Menu/Settings: Various additional settings may be set in the settings page. Most important is the IR delay for DSLRs. The IR delay accounts for the time between each turn of the table (i.e., moving object) and needs to be large enough to prevent the object from moving whilst taking images. Especially when long exposures are used, the resulting IR delay may be up to 5 or more seconds.
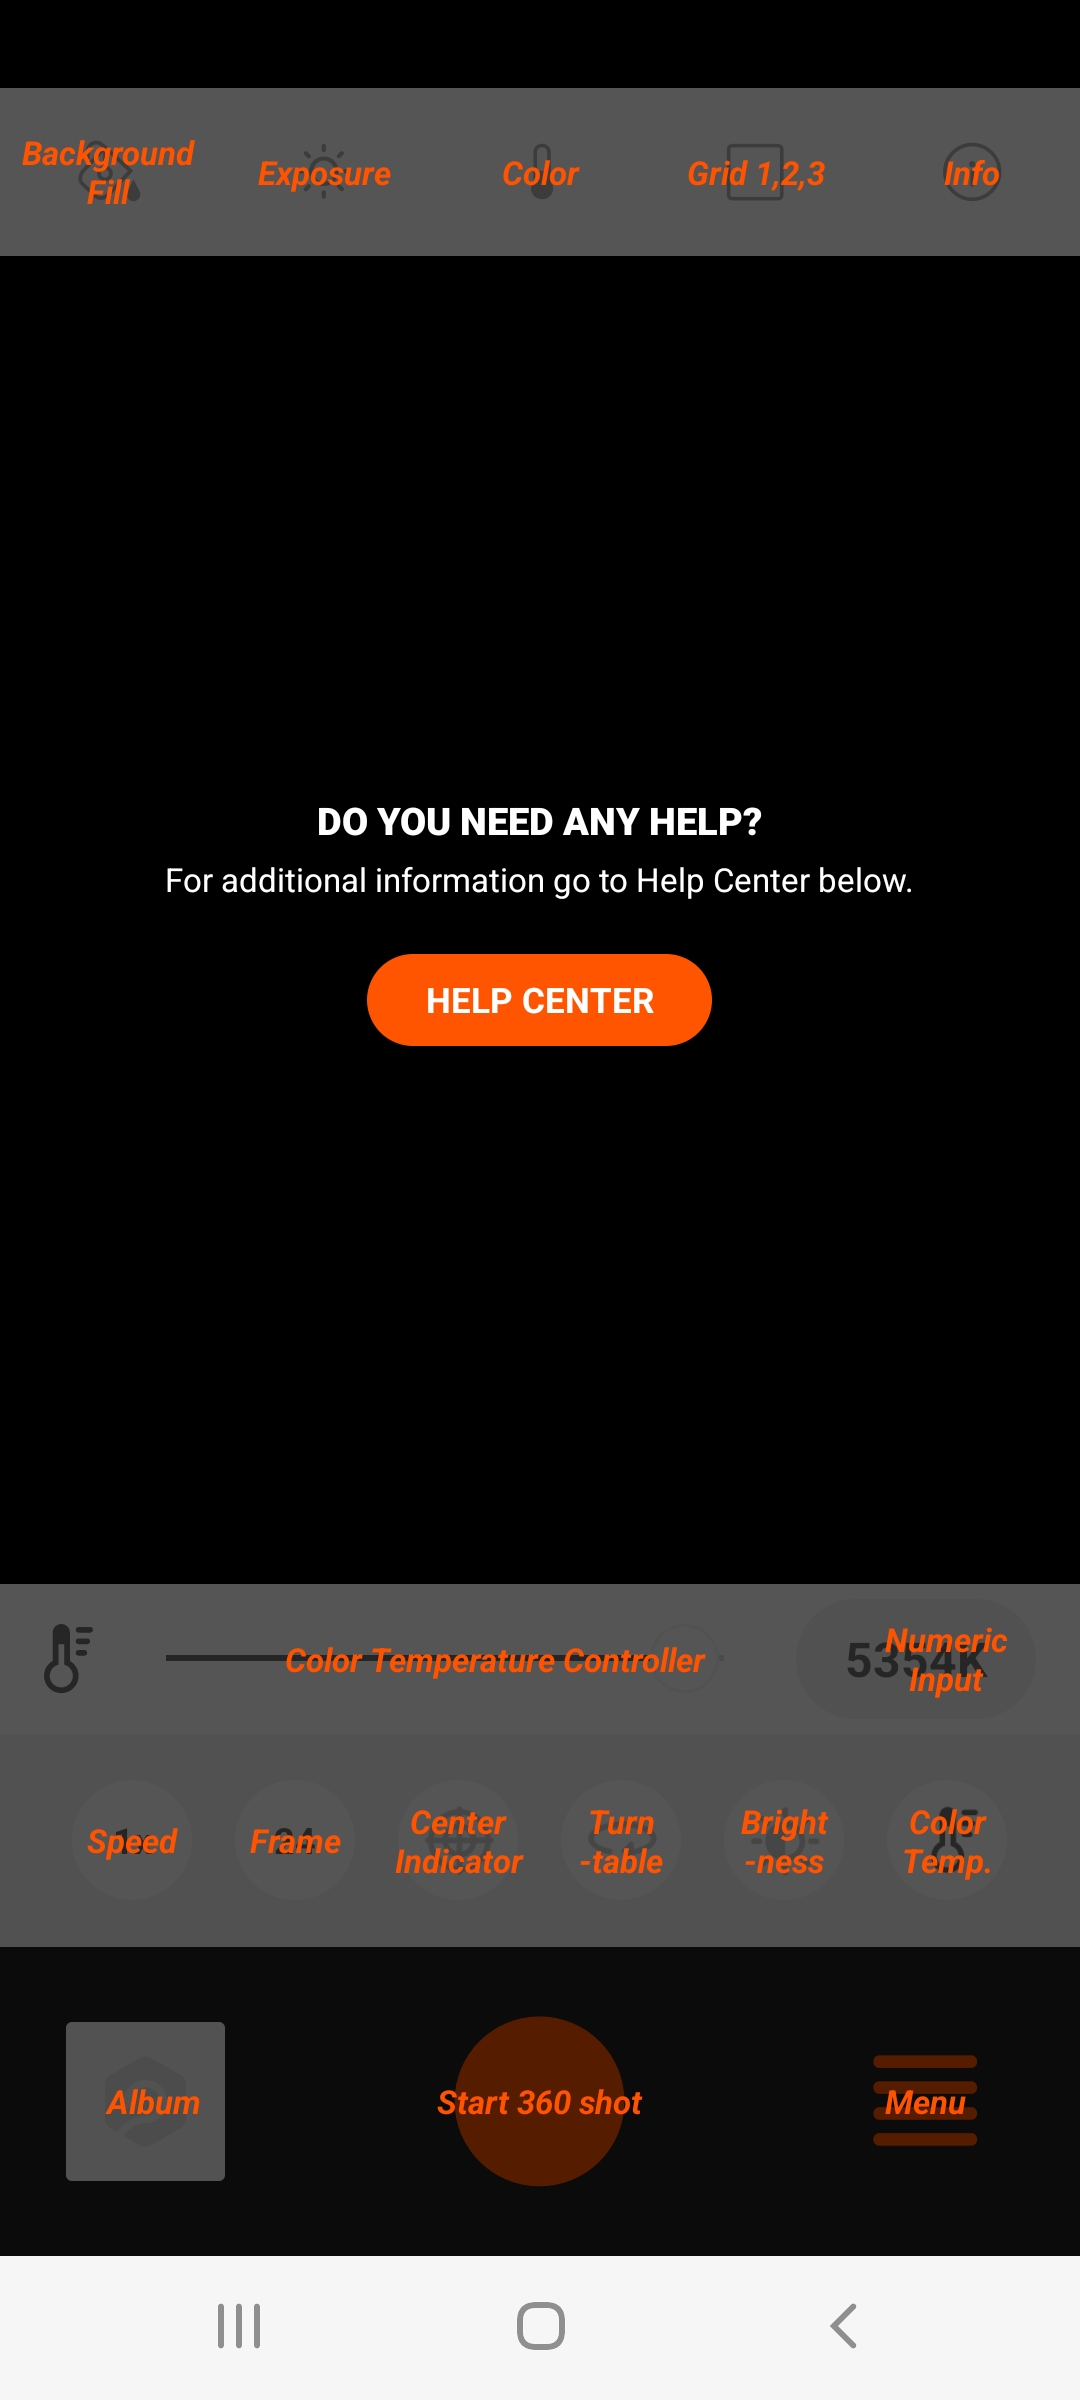
Fig. 47 Menu displayed on the Foldio360 App.#
Start 360 shot: Click the orange button when ready for automated photo acquisition. The device will start rotating and the phone/camera will take as many pictures as the ones defined in the Frame menu.
Foldio360 with DSLR (connected to PC)#
Connect to the Foldio360 device#
Connect to the Foldio360 device using your phone/tablet as per above. After the Foldio360 device has been linked to your phone, click the four bars on the lower-right corner of your screen and select DSLR 360.
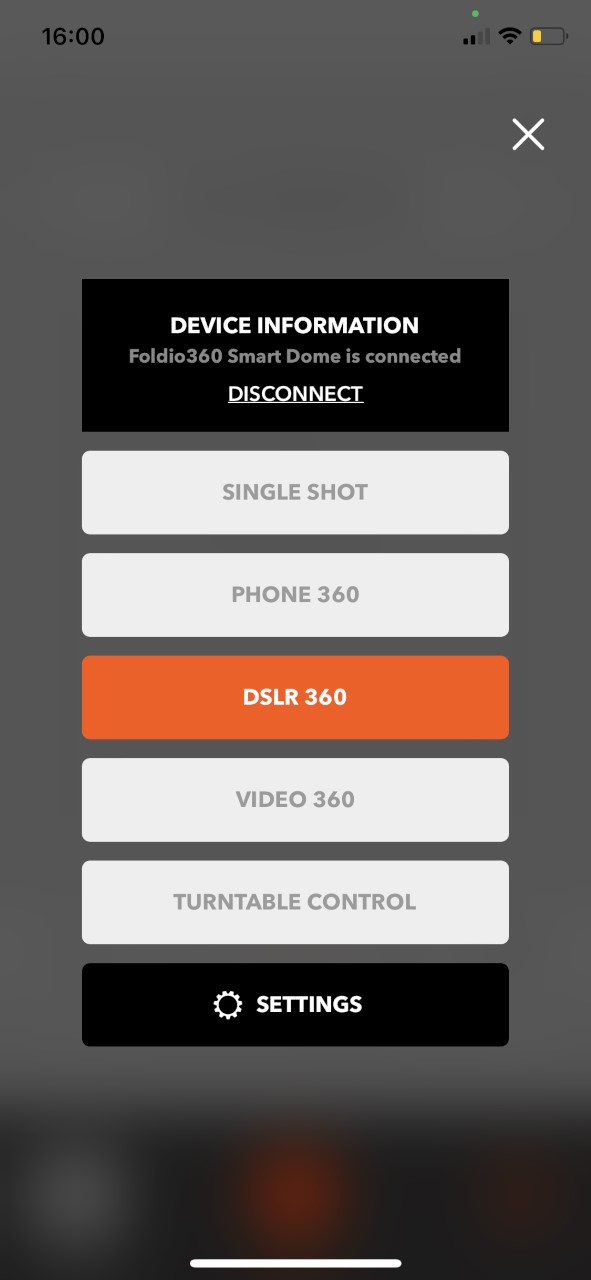
Fig. 48 DSLR360 connection.#
Press Connect button and select the foldio device. Then select the camera type you are using to connect to the camera.
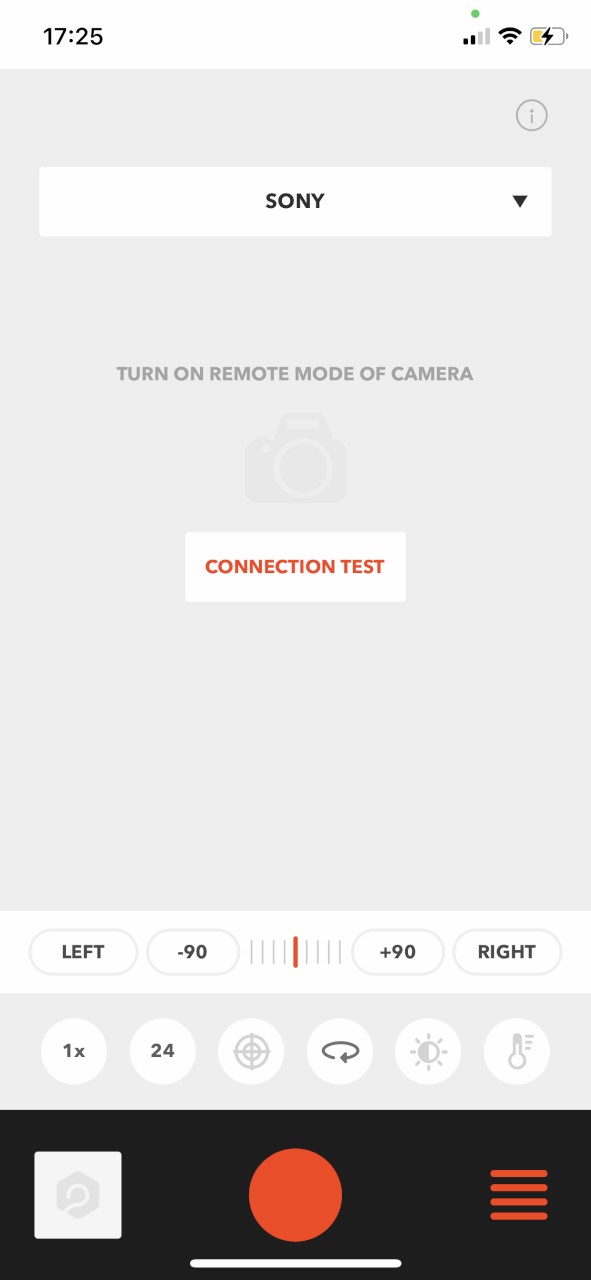
Fig. 49 Camera connect on remote mode.#
Press the four bars on the low-right corner to select Settings. Under SETTINGS > DSLR > IR remote delay define the IR remote delay* to 4-5 seconds to ensure that the photos are not taken while the table is rotating.
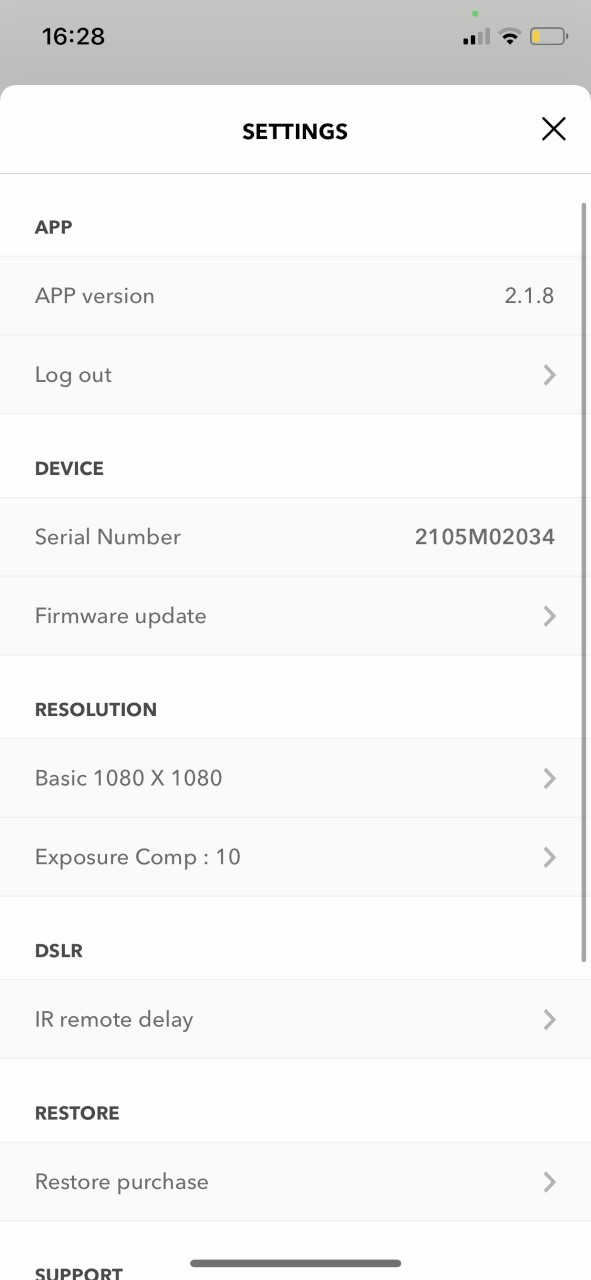
Fig. 50 DSLR Settings.#
Tip
Make sure that the color temperature matches the White Balance settings in the Imaging Edge Desktop App. This, however, is a few steps further.
Connect the camera to the computer#
Physically connect the camera to the computer and open the remote control app. Use the Imaging Edge Desktop App on your PC for Sony cameras. Turn on the camera. Double-click it on the Edge Remote App to link the camera to it. If it doesn’t show, refresh the window.
Depending on the chosen camera and compatibility with the app solution, there should now be a live camera image on your computer screen. Now, adjust and center the sample on the screen by changing the camera position and zooming. Do this by physically adjusting the camera and distance to the sample. Then adjust the photo acquisition parameters, here outlined for the Imaging Edge Desktop App.
Imaging Edge Desktop App#
Going from top to bottom in the Imaging Edge Desktop App menu, we recommend using the following settings:
Shooting: Do not change
Mode: Normal
Main Settings:
Camera mode: keep it in Manual
Shutter speed: Lower it as much as needed to adapt the light after defining the F and ISO values
Focus (F): Keep it as high as possible (around 30 is a good value)
ISO: Keep it as low as possible (50-200 is a good range)
EV: Do not change
Flash: Disabled/do not change
Sub Settings: Make sure that the White Balance/Sub Settings is the same as the Color Temperature defined in the Foldio360 App on your phone (5600 K is a good value).
Focus: Try both Manual Focus (MF) and Auto Focus (AF). If no big changes, go with AF.
Histogram: The color bars should be merged into one in the highest peak. You do this either manually adjusting the focus on your camera or clicking the arrows in the app.
Save Settings: Click on the three dots and define the file path where you want to save the data. Make sure to save your files directly in the standardised folder structure.
Tip
We recommend starting your workflow by defining the file path where you want to save the data. Keeping a good data structure is essential. You will always know where your data is, it will help avoid mistakes and data loss.
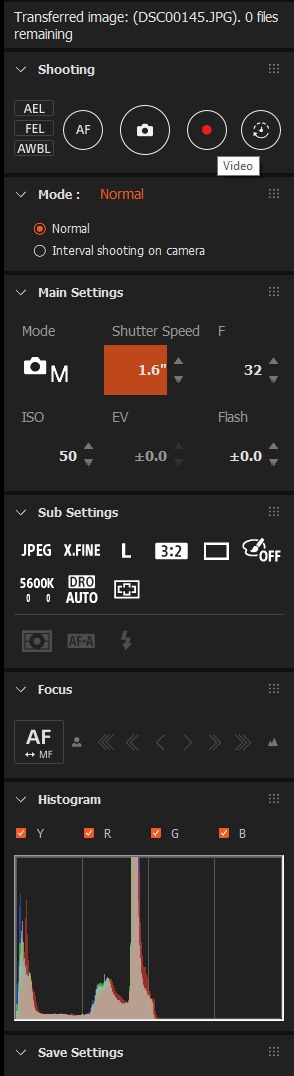
Fig. 51 Camera settings on the Imaging Edge Desktop App.#
To check that all the settings are optimal for photo acquisition, take a Connection Test by clicking on the camera icon in the “Shooting” menu, or in the phone/tablet menu. By doing this, you will take a single shot. It will allow you to double-check that the picture is focused, the colors are correct, the file path is the desired one, etc.
If everything is correct, you can start with the photo acquisition. Once completed, make sure to physically turn/rotate your sample to capture additional imaging rings/haloes to fully digitize your samples in 3D.